
2018-09-28
5206
原创
第八篇 : 消息总线(Spring Cloud Bus)
简介
Spring Cloud Bus 将分布式的节点用轻量的消息代理连接起来。它可以用于广播配置文件的更改或者服务之间的通讯,也可以用于监控。本文要讲述的是用Spring Cloud Bus实现通知微服务架构的配置文件的更改。 ##一、准备工作 本文还是基于上一篇文章来实现,备份代码,复制成新项目使用,按照官方文档,我们只需要在配置文件中配置 spring-cloud-starter-bus-amqp ;这就是说我们需要装rabbitMq,点击rabbitmq下载。至于怎么使用 rabbitmq,搜索引擎下。 ##二、改造 config-client ###1. pom.xml 在pom文件加上起步依赖spring-cloud-starter-bus-amqp,完整的配置文件如下:
<?xml version="1.0" encoding="UTF-8"?>
<project xmlns="http://maven.apache.org/POM/4.0.0" xmlns:xsi="http://www.w3.org/2001/XMLSchema-instance"
	xsi:schemaLocation="http://maven.apache.org/POM/4.0.0 http://maven.apache.org/xsd/maven-4.0.0.xsd">
	<modelVersion>4.0.0</modelVersion>

	<groupId>com.gf</groupId>
	<artifactId>config-client</artifactId>
	<version>0.0.1-SNAPSHOT</version>
	<packaging>jar</packaging>

	<name>config-client</name>
	<description>Demo project for Spring Boot</description>

	<parent>
		<groupId>com.gf</groupId>
		<artifactId>chapter08</artifactId>
		<version>0.0.1-SNAPSHOT</version>
	</parent>

	<dependencies>
		<dependency>
			<groupId>org.springframework.boot</groupId>
			<artifactId>spring-boot-starter-web</artifactId>
		</dependency>
		<dependency>
			<groupId>org.springframework.cloud</groupId>
			<artifactId>spring-cloud-starter-config</artifactId>
		</dependency>

		<dependency>
			<groupId>org.springframework.boot</groupId>
			<artifactId>spring-boot-starter-test</artifactId>
			<scope>test</scope>
		</dependency>
		<dependency>
			<groupId>org.springframework.cloud</groupId>
			<artifactId>spring-cloud-starter-netflix-eureka-server</artifactId>
		</dependency>
		<dependency>
			<groupId>org.springframework.cloud</groupId>
			<artifactId>spring-cloud-starter-bus-amqp</artifactId>
		</dependency>

		<dependency>
			<groupId>org.springframework.boot</groupId>
			<artifactId>spring-boot-starter-actuator</artifactId>
		</dependency>

	</dependencies>


</project>
###2. bootstrap.yml 在配置文件bootstrap.yml中加上RabbitMq的配置,包括RabbitMq的地址、端口,用户名、密码。并需要加上spring.cloud.bus的三个配置,具体如下:
spring:
  application:
    name: config-client
  rabbitmq:
    host: 172.16.1.37
    port: 5672
    username: guest
    password: guest

  cloud:
    config:
      label: master
      profile: dev
      #uri: http://localhost:8888/
      discovery:
        enabled: true
        service-id: config-server
    bus:
      enabled: true
      trace:
        enabled: true
server:
  port: 8881
eureka:
  client:
    service-url:
      defaultZone: http://localhost:8889/eureka/
management:
  endpoints:
    web:
      exposure:
        include: bus-refresh
###3. 主启动类 ConfigClientApplication
package com.gf;

import org.springframework.beans.factory.annotation.Value;
import org.springframework.boot.SpringApplication;
import org.springframework.boot.autoconfigure.SpringBootApplication;
import org.springframework.cloud.context.config.annotation.RefreshScope;
import org.springframework.cloud.netflix.eureka.EnableEurekaClient;
import org.springframework.web.bind.annotation.GetMapping;
import org.springframework.web.bind.annotation.RestController;

@SpringBootApplication
@RestController
@EnableEurekaClient
@RefreshScope
public class ConfigClientApplication {

	/**
	 *	http://localhost:8881/actuator/bus-refresh
	 */

	public static void main(String[] args) {
		SpringApplication.run(ConfigClientApplication.class, args);
	}

	@Value("${foo}")
	String foo;

	@GetMapping("/hi")
	public String hi() {
		return foo;
	}

}
依次启动eureka-server、confg-cserver,启动两个config-client,端口为:8881、8882。
访问http://localhost:8881/hi 或者http://localhost:8882/hi 浏览器显示:
dev
这时我们去代码仓库将foo的值改为“dev-1”,即改变配置文件foo的值。如果是传统的做法,需要重启服务,才能达到配置文件的更新。此时,我们只需要发送post请求:http://localhost:8881/actuator/bus-refresh,你会发现config-client会重新读取配置文件
 这时我们再访问http://localhost:8881/hi 或者http://localhost:8882/hi 浏览器显示:
dev-1
另外,/actuator/bus-refresh接口可以指定服务,即使用”destination”参数,比如 “/actuator/bus-refresh?destination=customers:**” 即刷新服务名为customers的所有服务。
##三、分析
此时的架构图:
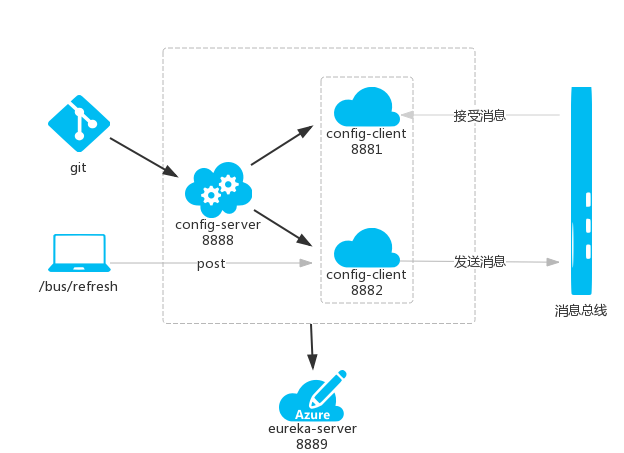
当git文件更改的时候,通过pc端用post 向端口为8882的config-client发送请求/bus/refresh/;此时8882端口会发送一个消息,由消息总线向其他服务传递,从而使整个微服务集群都达到更新配置文件。
springcloud


评论